Brandmotion 2000-4214 User Manual
Browse online or download User Manual for For the car Brandmotion 2000-4214. Brandmotion 2000-4214 User Manual
- Page / 1
- Table of contents
- BOOKMARKS
Rated. / 5. Based on customer reviews
4202 - 4214 Instructions 5-17-13.doc Page 1 of 1
2000-4202, 2000-4212, 2000-4204 & 2000-4214 Installation
Instructions (LoftLite LED Interior Lighting 2-pack & 4-pack)
IMPORTANT: Check kit contents and read instructions before installing. For the latest full color instructions please visit
www.brandmotion.com
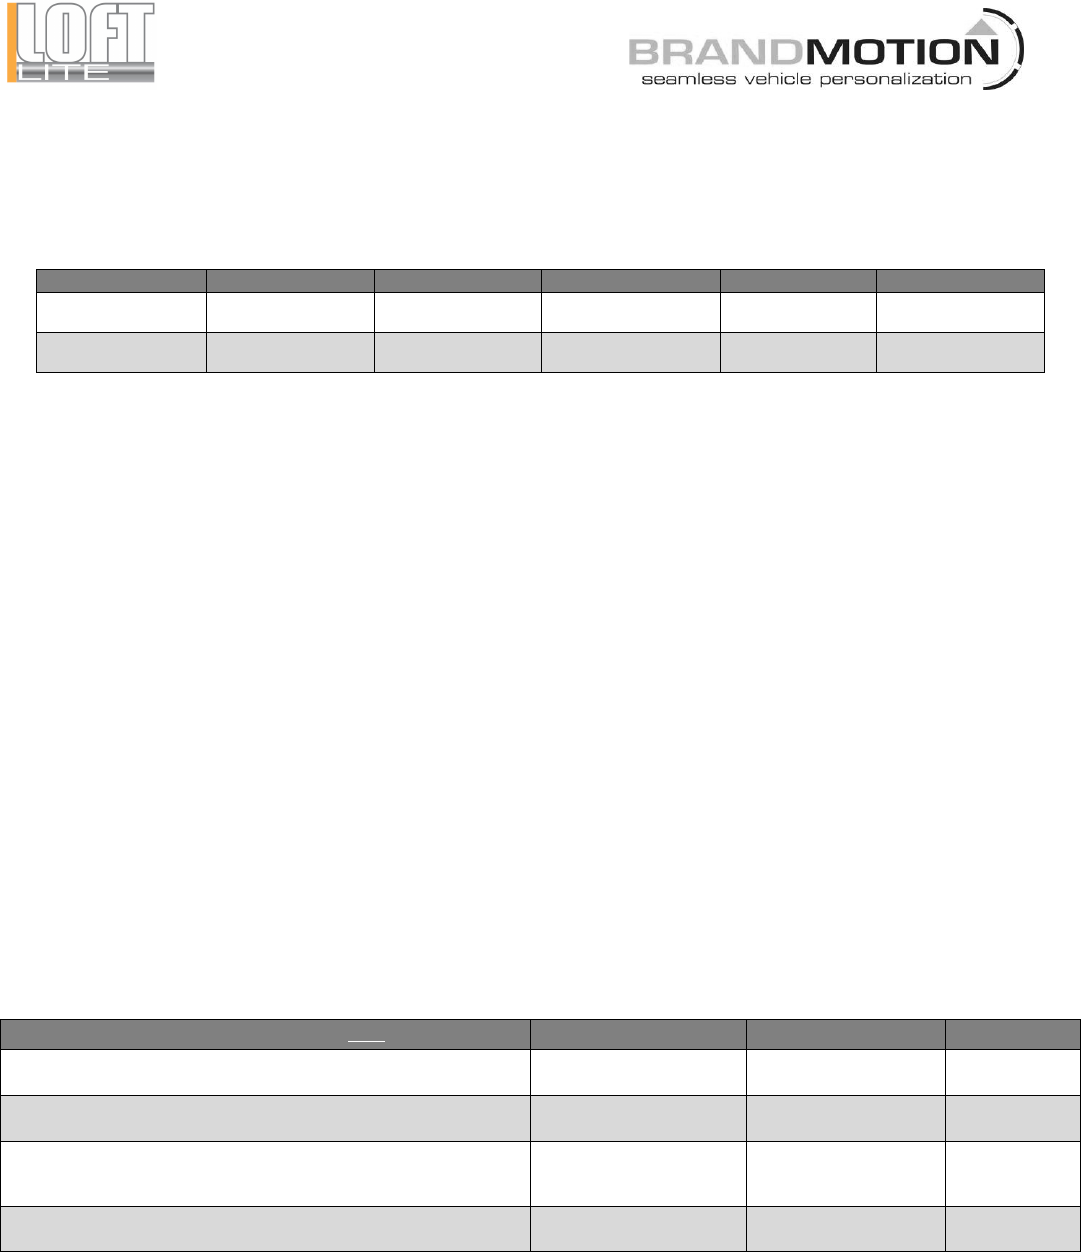
Kit Contents (item quantity varies according to SKU)
Kit Numbers
LoftLites
LoftLite Bezels
LoftLite Harness
Posi-Taps
Foam Spacers
2000-4202 - warm
2000-4212 - cool
2
2
1
3
6
2000-4204 - warm
2000-4214 - cool
4
4
2
6
12
Tools Required
X-Acto Knife or Roto Tool Wire Cutters / Wire Strippers Measuring Tape
Plastic Trim Removal Tool Digital Multi-meter or Computer-safe Test Light Felt Tip Marker
LoftLite Mounting
1. Determine LoftLite mounting locations. LoftLites may be installed in soft substrate such as a headliner or in hard
substrate such as an overhead console or plastic panel. Substrate thickness should be a minimum of 3mm to a
maximum of 7mm compressible thickness.
2. Gain access to the back side of the substrate in which LoftLites are to be mounted (NOTE: It may be necessary
to use a Plastic Trim Removal Tool to remove A-pillar and windshield header trim, overhead console, sunvisors,
mirror covers, coat hooks, headliner, etc.)
3. Select LoftLite locations and mark the position of each LoftLite with a Felt Tip Marker.
4. Use an X-Acto Knife or Roto Tool to cut a 1 1/8” opening at the desired position of each LoftLite.
5. Insert LoftLite Bezel into the hole with the flat side facing downward.
6. Snap LoftLites into Bezels.
7. (If required) Remove backing from a supplied Foam Spacer to expose adhesive and stick to back of LoftLite.
Stack additional Foam Spacers on top of LoftLites as needed to achieve desired button feel.
LoftLite Wiring
1. Use a digital multimeter to test for vehicle Battery (Constant) Power (+), Courtesy Power (+), and Ground (–)
signals. Typical locations are in the headliner near the dome light or overhead console (if equipped), behind the
driver or passenger side kick panel, or under the dash.
2. Set vehicle parking brake and start vehicle to test for Ignition-controlled Power (+).
3. Plug LoftLite Harness into LoftLites.
4. Route LoftLite Harness beneath headliner (and, if necessary, down the A-pillar and behind dash.)
5. Use supplied Posi-Taps to connect LoftLite Harness Red, White, and Black wires according to your preferred
LoftLite functions: (NOTE: For Posi-Tap use instructions, please link to www.posi(lock.com/posiplug.html)3
LoftLite Function Option (Choose one)
Red Wire
White Wire
Black Wire
Enables LoftLite Push-Push function at any time* AND Allows LoftLites
to illuminate along with your vehicle’s courtesy lights.
12v+ Battery (Constant)
Power
12v + Courtesy Power
Chassis Ground
Enables only LoftLite Push-Push function at any time.*
12v+ Battery (Constant)
Power
Not required
Chassis Ground
Enables LoftLite Push-Push function when ignition key is in the ON
position AND allows LoftLites to illuminate along with your vehicle’s
courtesy lights.
12v + Ignition-controlled
Power
12v + Courtesy Power
Chassis Ground
Enables only LoftLite Push-Push function when ignition key is in the ON
position.
12v + Ignition-controlled
Power
Not required
Chassis Ground
*If inadvertantly left ON for extended periods, LoftLites will drain battery over time.
LoftLite Operation
1. If you chose to enable LoftLites’ “Push Push” lighting function, push the lens face to LoftLite turn ON, and push
it again to turn it OFF.
2. If you chose to connect LoftLites to Courtesy Power, LoftLites will illuminate whenever vehicle courtesy lights
illuminate and when the vehicle domelight is switched to ON.
1
Summary of Contents
Page 1
4202 - 4214 Instructions 5-17-13.doc Page 1 of 1 2000-4202, 2000-4212, 2000-4204 & 200
Related products and manuals for For the car Brandmotion 2000-4214
 (1 pages)
© 2020, manymanuals.com. All rights reserved. | 6.816 s |
 Manymanuals.com
 Manymanuals.de
 Manymanuals.fr
 Manymanuals.it
 Manymanuals.pl
 Manymanuals.cz
 Manymanuals.es
 Manymanuals-pt.com
Comments to this Manuals